Tutorial - Saving Objects and Child Collections Over RestApi with CodeTrigger
The default samples generated by CodeTrigger mostly deliver shallow saving of objects. If you encounter a scenario where you need to save a deep/nested collection of objects from the client over the Rest Services boundary, the following guide shows
how you can go about it.
This guide has been updated for version 5.1.0.0 (released June 10th 2017)
|
|
STEP 1 - Ensure you have a relevant test database
This tutorial is taken from a real world exercise, where the established database schema was as follows:
A 'Project' Table (with identity Id column)
---- A 'Provenance' table (with identity Id column). This table contains a foreign key reference to the Project table. ie. the Project has a collection of zero or more Provenance entities.
---- A 'WorkDetails' table (with identity Id column). This table contains a foreign key reference to the Provenance table. ie each Provenance has a collection of zero or more WorkDetail entities.
The requirement is to save a 'Project' plus its 2 nested layers of child entities, from a client, over the RestApi service boundary, to the server/db.
|
|
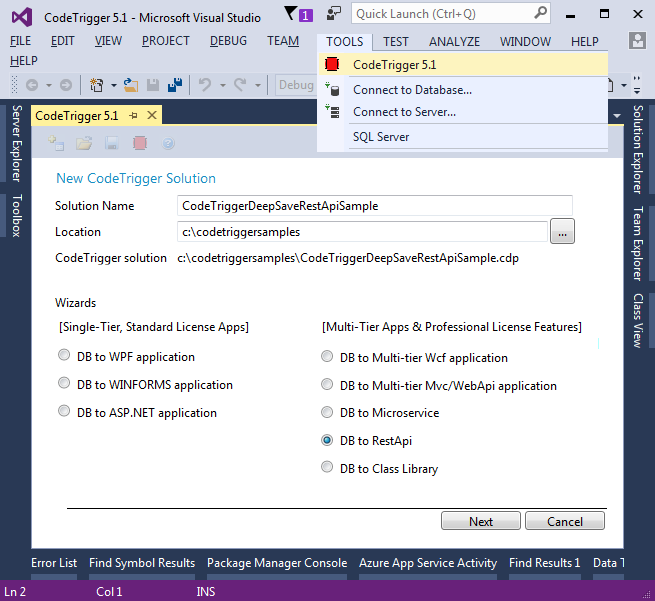
Step 2 - Create a new CodeTrigger project
From the Visual Studio 'Tools' menu (or from Enterprise Architect's 'Extensions' menu)...
Open CodeTrigger
Select 'New' (or '+' icon)
Solution Name = CodeTriggerDeepSaveRestApiSample
Location = C:\CodeTriggerSamples
As your Codetrigger Solution settings.
Select the 'DB to RestApi' wizard
Click Next
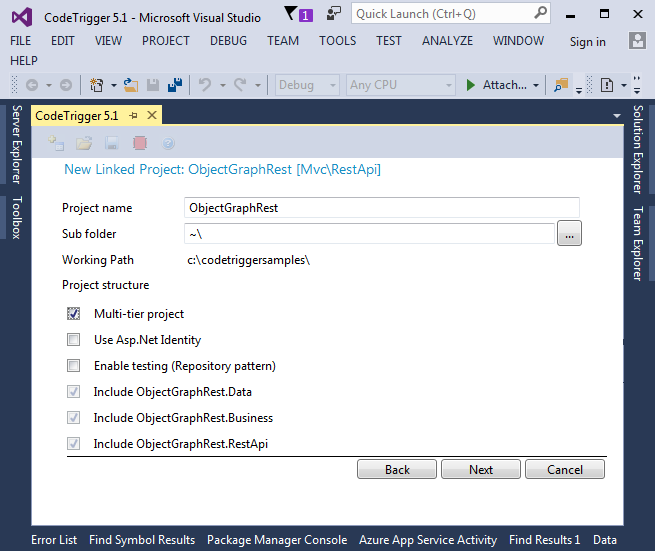
Name your new CodeTrigger project 'ObjectGraphRest'
Ensure that 'Multi-tier project' and 'Include ObjectGraphRest.RestApi' is ticked.
Click Next on the Wizard to setup the data source. Click 'Connect' to validate the data source.
|
|
|
Step 3 - Configure and Generate code
Configure datasource
Create project
Ensure 'Enable for Unit of Work pattern': Ticked
Select the related nested tables in the Schema Objects tab (For this tutorial this is 'Project', Provenance', 'WorkDetails')
Select the objects in the Business Objects tab. Be sure to expand the object and select the 'Entity Collection' child item so that collection management code is generated.
Generate the code.
|
|
Step 4 - Extend your generated business object classes
Add a folder called 'Extensions' to the ObjectGraphRest.Business project
Add the following partial class extensions to the Extensions folder:
/*ObjectGraphRest.Business/Extensions/BOProject.cs*/
using System.Collections.Generic;
using System.Linq;

namespace ObjectGraphRest.Business
{
    public partial class BOProject
    {
        public virtual IList<BOProvenance> Provenances
        {
            get
            {
                if (_boProvenanceCollection == null)
                    LoadProvenanceCollection();
                return _boProvenanceCollection != null ?
                    _boProvenanceCollection.ToList() : null;
            }
            set { _boProvenanceCollection = value != null ?
                value.ToList<BOProvenance>() : null; }
        }
    }
}


/*ObjectGraphRest.Business/Extensions/BOProvenance.cs*/
using System.Collections.Generic;
using System.Linq;

namespace ObjectGraph.Business
{
    public partial class BOProvenance
    {
        public virtual IList<BOWorkDetails> WorkDetails
        {
            get
            {
                if (_boWorkDetailsCollection == null)
                    LoadWorkDetailsCollection();
                return _boWorkDetailsCollection != null ?
                    _boWorkDetailsCollection.ToList() : null;
            }
            set
            { _boWorkDetailsCollection = value != null ?
                    value.ToList<BOWorkDetails>() : null;
            }
        }
    }
}
|
|
Step 5 - Add UnitOfWork Implementation
Copy the IUnitOfWork.cs and UnitOfWorkImp.cs classes as defined in the UnitOfWork tutorial here
to your ObjectGraphRest.Business/Implementation folder.
Fix the namespace(s) to match your correct project namespace.
|
|
Step 6 - Extend the RestApi ViewModels
Create a folder called ‘Extensions’ in the ObjectGraphRest.RestApi project and add the following classes to it
/*ObjectGraphRest.RestApi/Extensions/VmExtensions.cs*/
using System;
using System.Collections.Generic;
using System.Linq;
using System.Web;
using ObjectGraphRest.RestApi.SampleViewModels;

namespace ObjectGraphRest.RestApi.SampleViewModels
{
    public partial class ProjectVm
    {
        public IList<ProvenanceVm> Provenances { get; set; }
    }

    public partial class ProvenanceVm
    {
        public IList<WorkDetailsVm> WorkDetails { get; set; }
    }
}
|
|
Step 7 - Modify the ProjectController.cs file
Add the SampleApiControllers/ProjectController.cs file to your escaped files list in advanced options (so you don’t accidentally overwrite the following changes) and Replace the PostProject method with:
// POST: api/Project
[ResponseType(typeof(ProjectVm))]
public async Task<IHttpActionResult> PostProject(ProjectVm vm)
{
    if (!ModelState.IsValid)
    {   return BadRequest(ModelState); }

    var result = Task.Factory.StartNew(() =>
    {
        IUnitOfWork uow = new UnitOfWorkImp();
        var bo = vm.BOProject();
        uow.Create(bo);

        foreach (var provenanceVm in vm.Provenances)
        {
            var provenanceBO = provenanceVm.BOProvenance();
            uow.Create(new UnitOfWorkForwarder((Action)delegate { provenanceBO.ProjectID = bo.Id; }, null, null));
            uow.Create((provenanceBO));

            foreach (var workDetailsVm in provenanceVm.WorkDetails)
            {
                var workDetailsBO = workDetailsVm.BOWorkDetails();
                uow.Create(new UnitOfWorkForwarder((Action)delegate { workDetailsBO.ProvenanceID = provenanceBO.Id; }, null, null));
                uow.Create((workDetailsBO));
            }
        }

        string err;
        if (!uow.Commit(out err))
        {
            var resp = new HttpResponseMessage(HttpStatusCode.BadRequest) { Content = new StringContent(err) };
            throw new HttpResponseException(resp);
        }
        vm = new ProjectVm(bo);
        return true;
    });
    await result;
    return CreatedAtRoute("DefaultApi", new { id = vm.Id }, vm);
}
|
|
Step 8 - Modify client script and Test your Deep Saving RestApi Client-Server App
Finally, test this with some mock code, Add SampleScripts/Project.js to Escaped files list so you don’t accidentally overwrite it, comment out and replace the ‘getformvalues()’ javascript function with
function getformvalues() {

    var projectName = "Project 1000";
    var provenanceName = "Provenance 100";
    var workDetailsName = "Some Work Details";

    var project = {
        "Name": projectName,
        "Provenances" : []
    };

    var provenance = {
        "Name": provenanceName,
        WorkDetails: []
    };

    var workDetails = {
        "Name" : workDetailsName
    };

    provenance.WorkDetails.push(workDetails);
    project.Provenances.push(provenance);

    return JSON.parse(JSON.stringify(project));

}
|
|
Fire up the application, go to Sample Pages -> Projects->Add new project. Just click ‘Add’ and the mock data should be posted to your controller.
Step through the controller and see the deep collection saved in a transaction to the database.
|