Tutorial - Using the Generation Scope feature to create interface libraries and service based architecture
|
The default behaviour of CodeTrigger wizards is to create single-tier or 3-tier solutions along the lines of UI layer/Business layer/Data layer. Sometimes a different approach is required on a project,
for example if Domain Driven Design approach is being followed or some other custom derivation. Under these circumstances it can be difficult for the inexperienced user to see how CodeTrigger can be
configured to support the approach. The purpose of this article is to illustrate one way of reconfiguring CodeTrigger to match your design and development approach and along the way it will demonstrate
some advanced features of the tool.
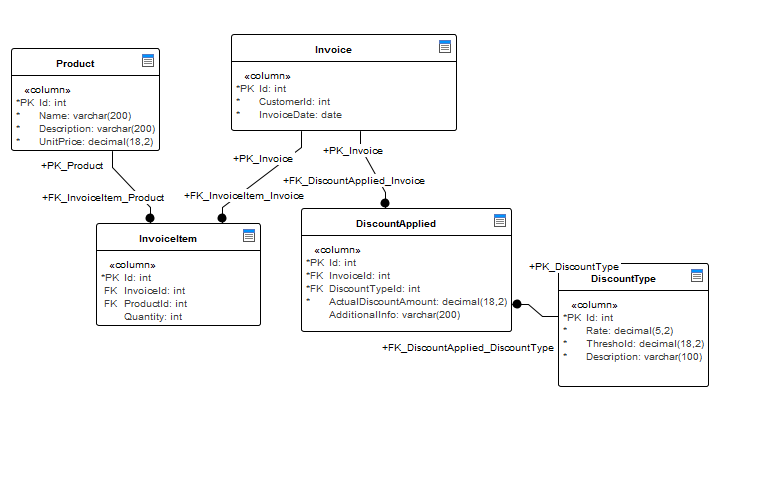
Taking the example of a company Acme, that sells products and generates invoices. The sales/business logic dictates that bulk buyers get a discount, the amount of the discount is dependent on the size of the bulk purchase.
This logical rule will require any code generated from the db schema to be modified to include this rule. The question of where and how to include the modified code then arises.
Starting with a (partial) database design like this:
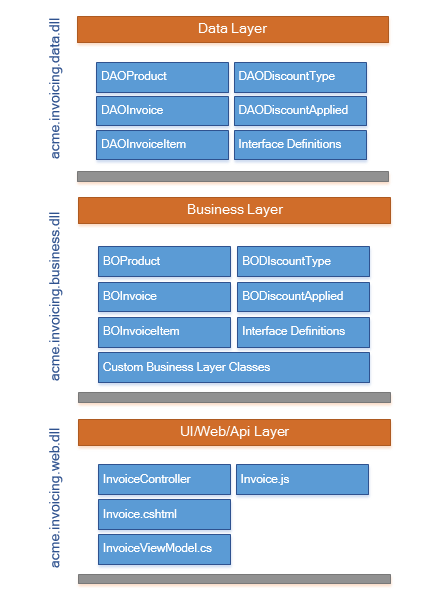
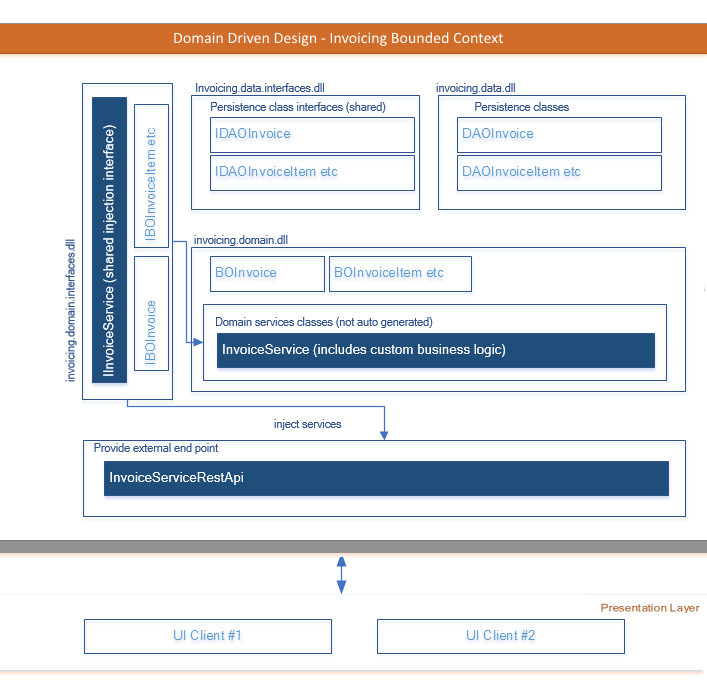
CodeTrigger wizard default behaviour is to produce a solution structure based on the classic 3-tier (assuming you use the Multi-Tier Mvc wizard). Proponents of Doman Driven Design and SOA might prefer a structure that looks more like the alternative DDD-influenced illustration.
In the DDD design, the solution is divided up into 'Bounded Contexts' with specific responsibilities eg Invoicing. You can then envisage a vertical slice through the stack from UI through some services to the persistence layer,
all dedicated to invoicing and separated as much as possible from the other facilities of the organisation (such as Product procurement, Customer management etc).
Looking at this design its helpful to be able to generate common libraries containing just interfaces that can be shared among the different runtime components.
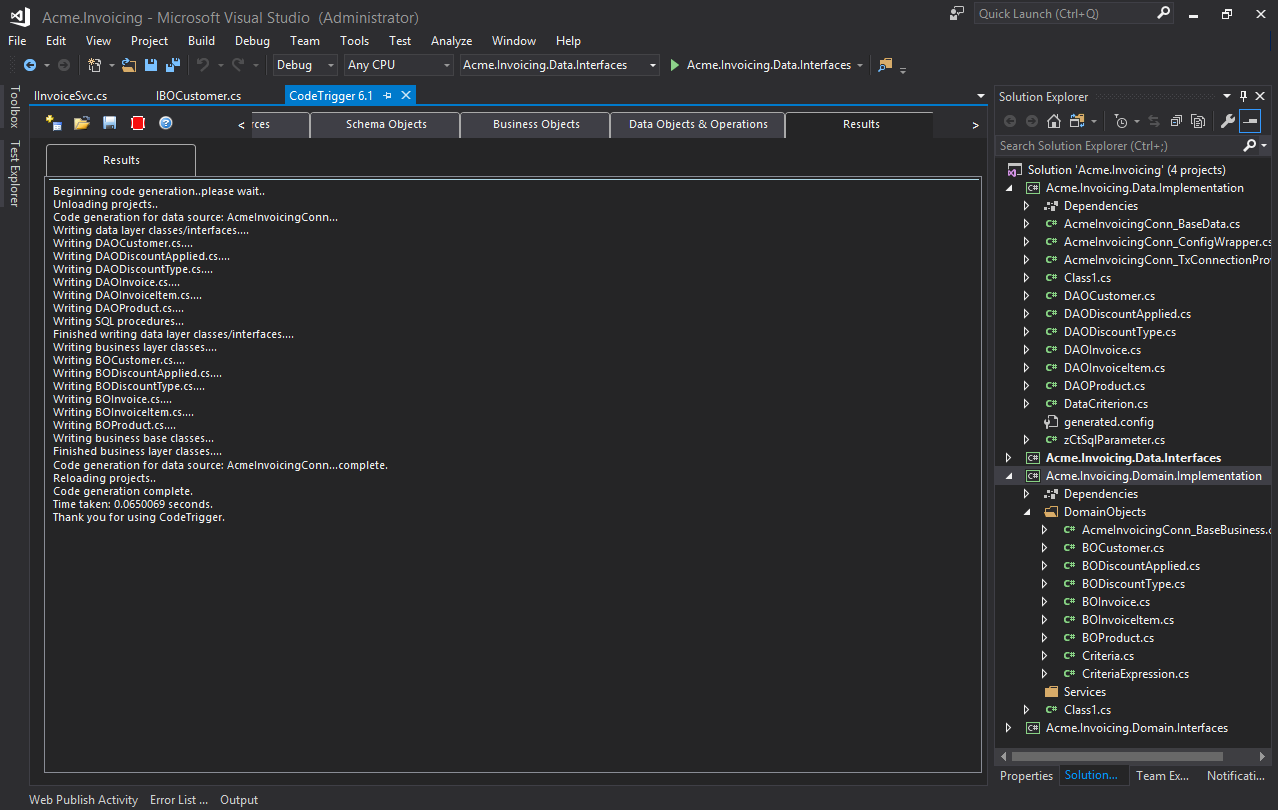
Generating distinct common interface libraries with CodeTrigger is something that has become a lot easier since version 6.1.
CodeTrigger can be configured to generate code in the DDD based structure, by making use the (new in version 6.1) advanced options : 'Generation Scope' combined with the 'Generated interfaces' option.
The approach would basically be to use the CodeTrigger wizard to create the approximate project structure, and then use the configuration options in CodeTrigger to split the files generated into the appropriate assemblies, supporting your required architecture.
This article describes this approach in detail, to produce an implementation reflecting the Domain Driven Design on the Invoicing functionality in the fictitious Acme Corporation, along the way demonstrating some of the advanced features of CodeTrigger 6.1+
Although the projects are shown for a .Net Core based solution, the same approach can be taken with the non .NetCore wizards.
|
Default 3-tier architecture produced by CodeTrigger Multi-tier wizard |
|
|
Domain Driven Design - An Alternative Approach to the default CodeTrigger Wizard behaviour
|
Phase 1. Creating the solution and generating the interface/libraries.
|
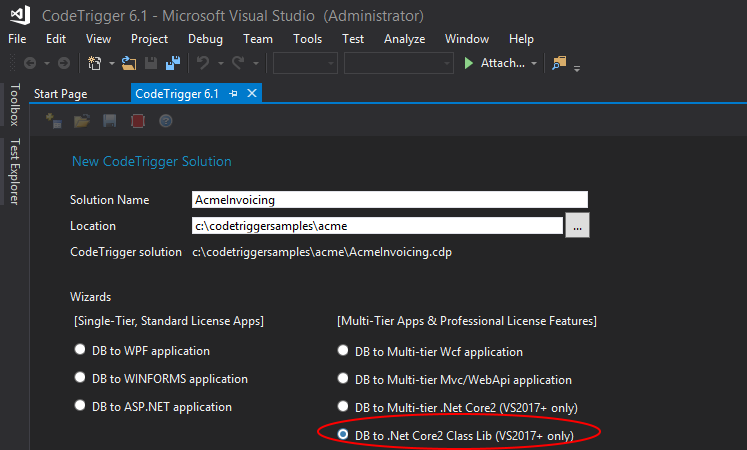
1. Create a codetrigger solution with the solution name and location as follows (for this tutorial), selecting the Net Core class lib wizard, and click Next
|
2. Name the initial project as follows and click Next
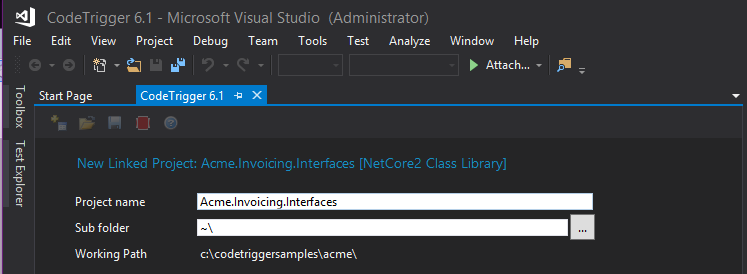
|
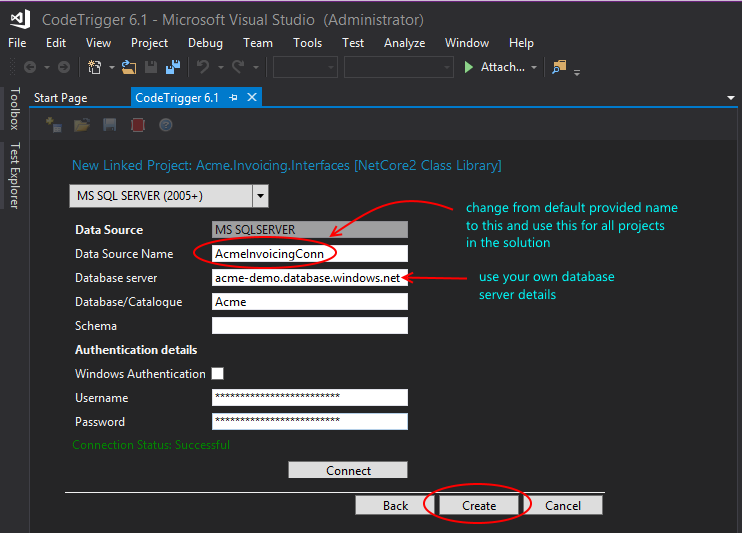
3. 3. Configure the data source, name it ‘AcmeInvoicingConn’, test the connection by clicking ‘Connect’, and then click ‘Create’
|
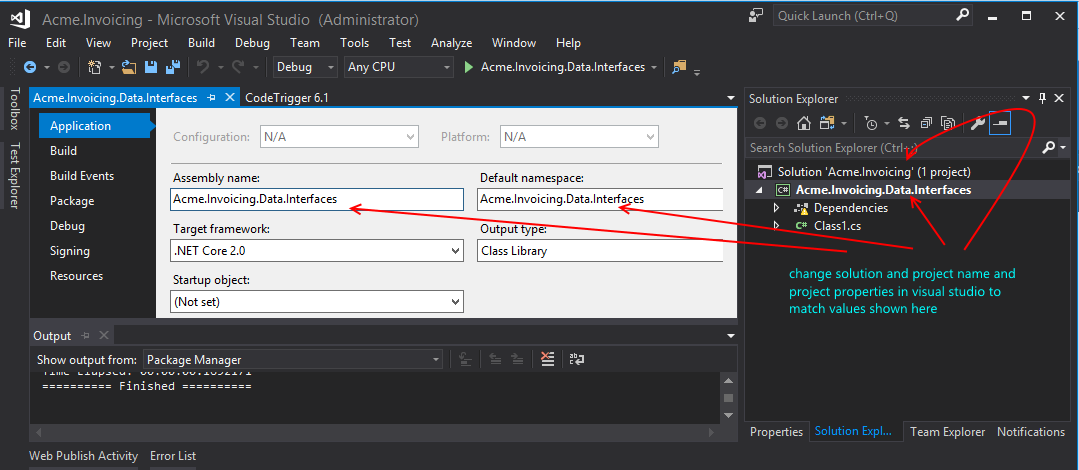
4. Change the Visual Studio solution name and project name and project properties as shown below and build solution to ensure new settings saved.
|
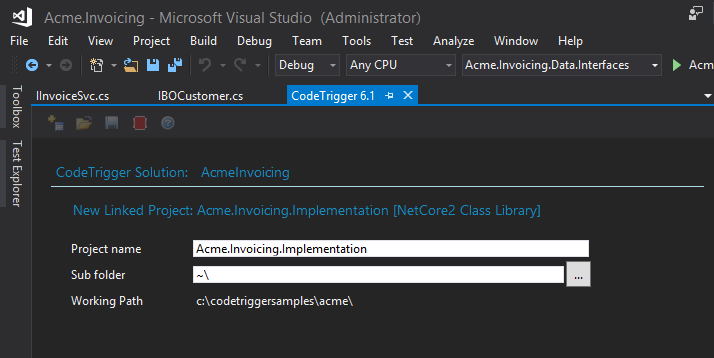
5. Add a new Net Core Class Lib project to the Visual Studio solution as shown, naming it as in the illustration.
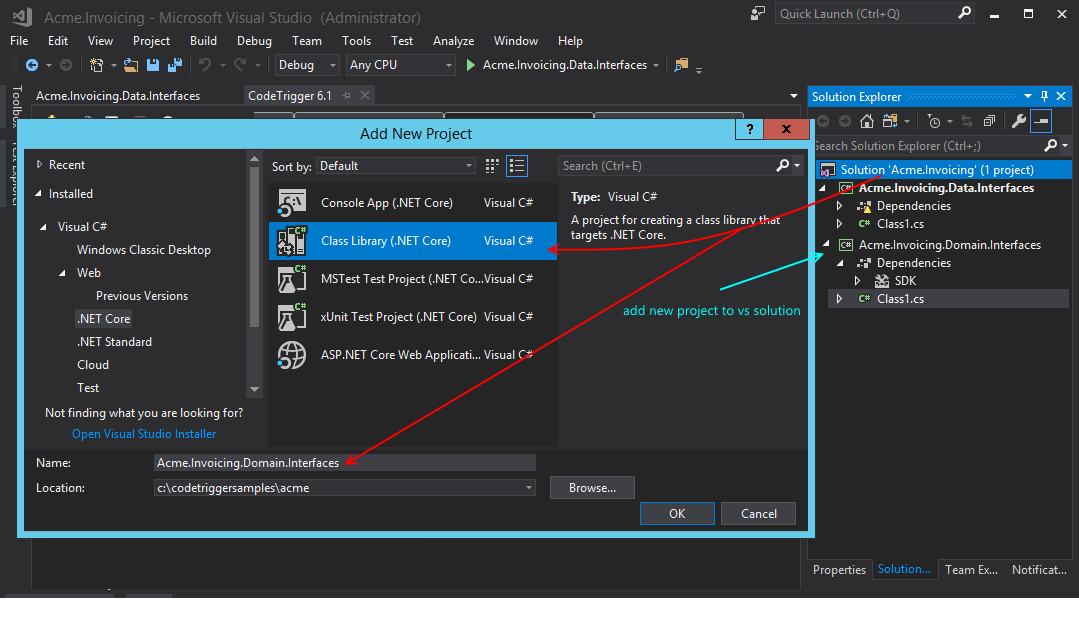
In the new Acme.Invoicing.Domain.Interfaces project, add a dependency/reference to the Acme.Invoicing.Data.Interfaces project.
|
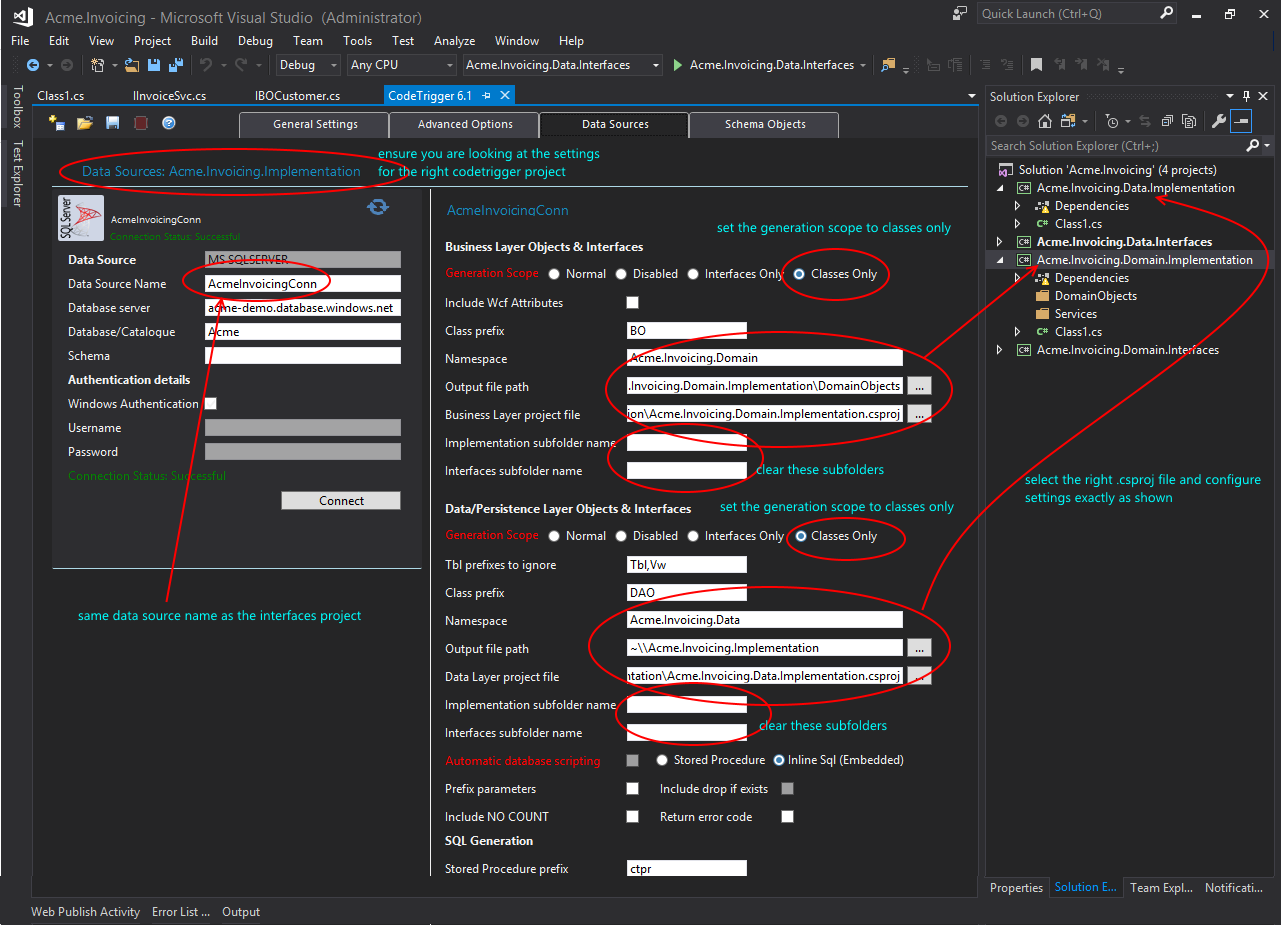
6. Now in the CodeTrigger ‘Data Sources’ tab, reconfigure the settings as shown, so that CodeTrigger splits the generated data layer and business layer interfaces into the 2 separate class libraries/assemblies.

|
7. In the advanced options tab, select ‘Generate interface definitions’, as shown.

|
8. Select all the relevant tables in the ‘Schema Objects’ tab, and again in the ‘Business Objects’ tab. Click the red button and all the interfaces are generated into the relevant shared class libs.
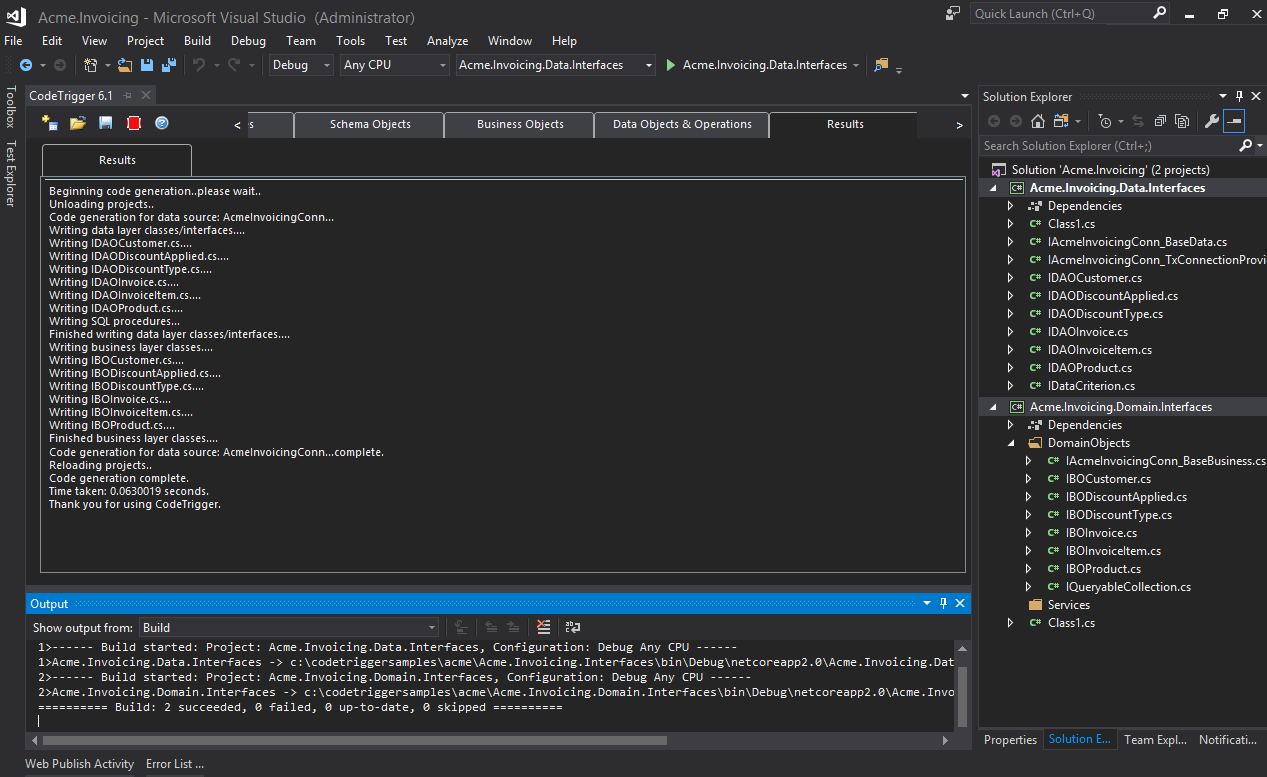
|
9. In the Services folder of the Acme.Invoicing.Domain.Interfaces project, create interface definitions for domain services that you might with to inject into a client/consumer project. For this article, we create an IInvoiceSvc.cs file with the following service definition:
/*IInvoiceSvc.cs*****************/
using System;
namespace Acme.Invoicing.Domain.Interfaces.Services
{
    public interface IInvoiceSvc
    {
        Tuple SaveNewInvoice(int customerId, Tuple[] orders);
        Tuple CalculateDiscount(Tuple[] orderItems);
     }
}
|
Phase 2. Generating the implementation classes/libs.
|
10. In the CodeTrigger ‘General Settings’ tab, add a new project using the NetCore Class Library wizard as follows, and click Next
|
11. Configure the data source exactly as in the interface project (step 3), ensuring you use the same Data Source name AcmeInvoicingConn and not the new/default provided one. Click Connect to test the connection and then click Create.
|
12. In the Visual Studio solution change the new project name and properties to Acme.Invoicing.Data.Implementation
|
13. In the Visual Studio solution add a new Net Core Class Library called Acme.Invoicing.Domain.Implementation, and create 2 sub folders in it called ‘DomainObjects’ and ‘Services’. Build the solution to ensure all your changes are saved.
In the new Acme.Invoicing.Data.Implementation project, add a reference to the Acme.Invoicing.Data.Interfaces project.
In the new Acme.Invoicing.Domain.Implementation project add references to the
Acme.Invoicing.Domain.Interfaces,
Acme.Invoicing.Data.Implementation, and
Acme.Invoicing.Data.Interfaces projects.
|
14. In the CodeTrigger Data Sources tab (ensure you are looking at the data sources tab for the new Acme.Invoicing.Implementation CodeTrigger project), make the configuration changes as follows, to split the generated implementation code into the 2 new assemblies/projects:
|
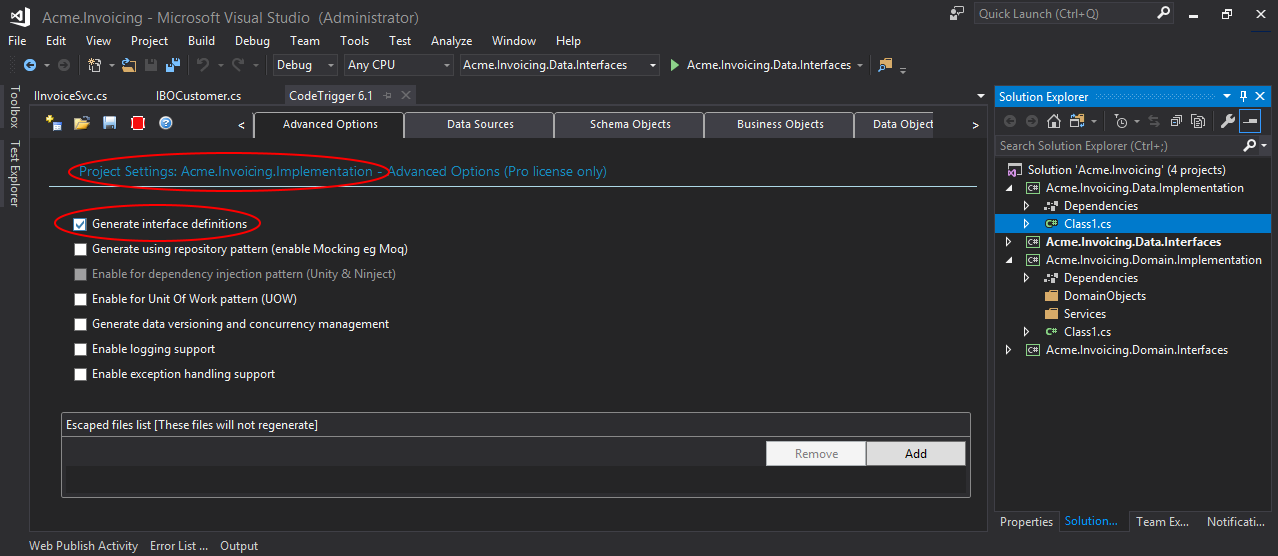
15. In the ‘Advanced Options’ tab ensure ‘Generate interface definitions’ is checked.
|
16. Select all the relevant tables in the ‘Schema Objects’ tab, and again in the ‘Business Objects’ tab. Click the red button and all the implementation code is generated into the relevant class libs/assemblies.
|
17. Next provide an implementation for your custom service interfaces. Add an InvoiceSvc.cs class to the Services folder of Acme.Invoicing.Domain.Implementation project, with the following implementation of the IInvoiceSvc interface.
using System;
using System.Linq;
using Acme.Invoicing.Domain.Interfaces;
using Acme.Invoicing.Domain.Interfaces.Services;

namespace Acme.Invoicing.Domain.Services
{
    public class InvoiceSvc : IInvoiceSvc
    {
        public Tuple SaveNewInvoice(int customerId, Tuple[] orderItems)
        {
            var newInvoice = new BOInvoice();
            newInvoice.CustomerId = customerId;
            newInvoice.InvoiceDate = DateTime.Now;
            newInvoice.SaveNew();

            foreach (var order in orderItems)
            {
                var ivl = new BOInvoiceItem();
                ivl.InvoiceId = newInvoice.Id;
                ivl.ProductId = order.Item1;
                ivl.Quantity = order.Item2;
                ivl.SaveNew();
            }

            var discount = CalculateDiscount(orderItems);
            if (discount.Item2 > 0)
            {
                var discountApplied = new BODiscountApplied();
                discountApplied.InvoiceId = newInvoice.Id;
                discountApplied.DiscountTypeId = discount.Item1;
                discountApplied.ActualDiscountAmount = discount.Item2;
                discountApplied.SaveNew();
            }
            var lineTotals = orderItems.Select(x => new BOProduct(x.Item1).UnitPrice * x.Item2);
            var listTotal = lineTotals.Sum();

            return new Tuple(
                (int)newInvoice.Id,
                (decimal)listTotal,
                discount.Item2,
                (decimal)listTotal - discount.Item2)
                ;
        }


        public Tuple CalculateDiscount(Tuple[] orderItems)
        {
            var lineTotals = orderItems.Select(x => new BOProduct(x.Item1).UnitPrice * x.Item2);
            var invoiceTotal = lineTotals.Sum();
            var discountTypes = BODiscountType.DiscountTypeCollection().OrderByDescending(x => x.Threshold);

            IBODiscountType applicableDiscount = discountTypes.FirstOrDefault(x => x.Threshold <= invoiceTotal);

            var applicableDiscountAmt = 0.0M;
            var discountTypeId = -1;

            if (applicableDiscount != null)
            {
                applicableDiscountAmt = invoiceTotal.Value * (applicableDiscount.Rate.Value / 100);
                discountTypeId = (int)applicableDiscount.Id;
            }

            return new Tuple(discountTypeId, applicableDiscountAmt);
        }
    }
}
|
Phase 3. A http/webapi interface with service implementation injected.
To provide a http based webapi interface for clients/presentation layer components to interact with our doman services, we use the standard visual studio project.
|
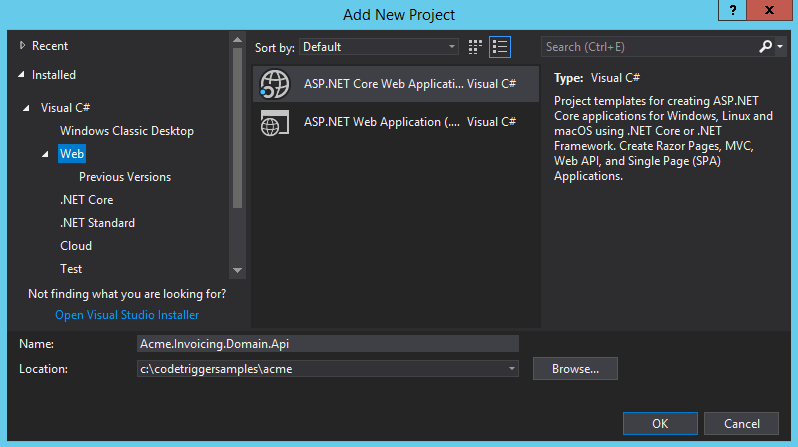
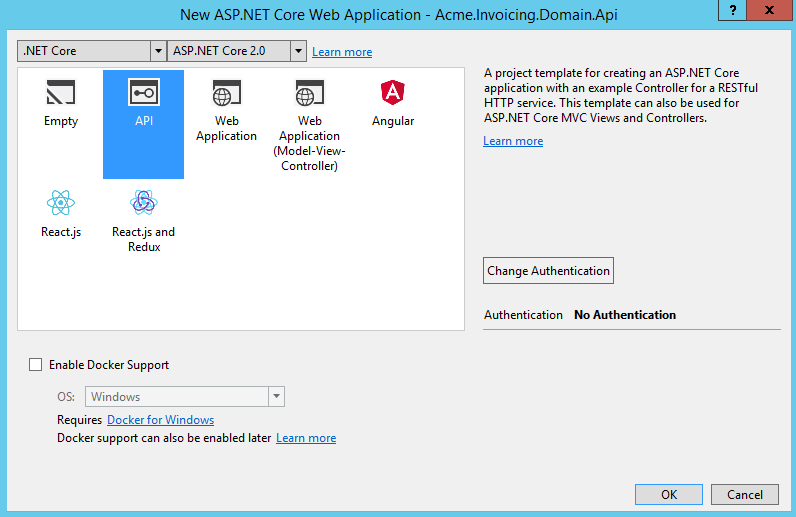
18. In the Visual Studio solution, add a Asp.Net Core Web application, and call it Acme.Invoicing.Domain.Api, and select ‘API’ or similar template.
In the new Acme.Invoicing.Domain.Api project, add references to the Acme.Invoicing.Domain.Interfaces and Acme.Invoicing.Domain.Implementation projects
Copy the ‘generated.config’ file from the Acme.Invoicing.Data.Implementation to this Api project and mark it as
‘Build Action’ : ‘None’ and
‘Copy to Output Directory’ : ‘Copy Always’
|
19. Add an Empy Api Controller called InvoicingController.cs to the Controllers folder, and add the following code to it
using System;
using Microsoft.AspNetCore.Mvc;
using Acme.Invoicing.Domain.Interfaces.Services;
using Acme.Invoicing.Domain.Services;
using Newtonsoft.Json;

namespace Acme.Invoicing.Domain.Api.Controllers
{

    public class InvoicingController : Controller
    {
        private IInvoiceSvc _iInvoiceSvc = null;
        /*use a container etc to inject the implementation of InvoiceSvc here through the controller,
         * to simplify we are instantiating it*/
        public InvoicingController(/*IInvoiceSvc iInvoiceSvc*/)
        {
            _iInvoiceSvc = new InvoiceSvc();
        }

        [HttpPost]
        [Route("applicablediscount")]
        public IActionResult ApplicableDiscount([FromBody]string serialized)
        {
            var orderItems = JsonConvert.DeserializeObject[]>(serialized);
            string ret = JsonConvert.SerializeObject(_iInvoiceSvc.CalculateDiscount(orderItems));
            return Ok(ret);

        }

        [HttpPost]
        [Route("saveneworder")]
        public IActionResult SaveNewOrder([FromBody]string serializedOrder)
        {
            dynamic order = JsonConvert.DeserializeObject(serializedOrder);
            string ret = JsonConvert.SerializeObject(_iInvoiceSvc.SaveNewInvoice(order.CustomerId.ToObject(), order.OrderItems.ToObject[]>()));
            return Ok(ret);

        }
    }
}
Build solution to make sure it builds and fix any reference issues.
|
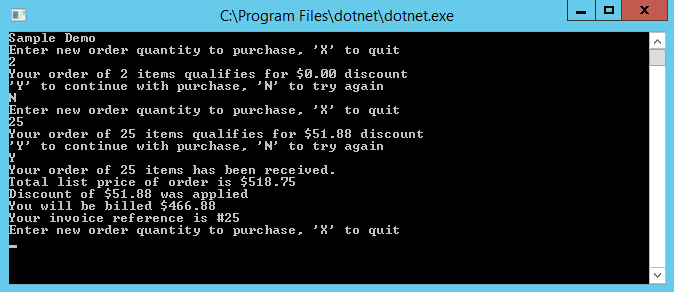
20. Finally, create a sample console client to consume your Api and test the functionality. In visual studio, Add a new Net Core ConsoleApp called ‘Acme.Invoicing.SampleClient’
Add the
Microsoft.AspNet.WebApi.Client Nuget and
Newtonsoft.json packages to it.
using Newtonsoft.Json;
using System;
using System.Net.Http;

namespace Acme.Invoicing.SampleClient
{
    class Program
    {
        private const string InvoicingApiRootUrl = "http://localhost:xxxx";
        static HttpClient client = new HttpClient();

        static void Main(string[] args)
        {
            Console.WriteLine("Sample Demo");
            RunDemo();
            Console.WriteLine("Demo complete. Press enter to exit");
            Console.ReadLine();
        }

        private static void RunDemo()
        {
            //functionality in here depends on the data you have scripted into your db,
            //eg product ids and discount thresholds
            int someProductId = 3;
            int customerId = 1;

            while (true)
            {

                int quantity = 0;
                bool responseInvalid = true;
                Console.WriteLine("Enter new order quantity to purchase, 'X' to quit");

                while (responseInvalid)
                {
                    var e = Console.ReadLine();
                    if (e.ToLower() == "x")
                        return;

                    if (responseInvalid = !int.TryParse(e, out quantity))
                    { Console.WriteLine("invalid quantity value, try again. 'X' to quit");  }
                }


                var orderItems = new[] { new Tuple(someProductId, quantity) };
                var serialized = JsonConvert.SerializeObject(orderItems);

                HttpResponseMessage response1 =
                    client.PostAsJsonAsync(InvoicingApiRootUrl + @"/applicablediscount", serialized).Result;
                response1.EnsureSuccessStatusCode();

                Tuple discount = JsonConvert.DeserializeObject>
                    (response1.Content.ReadAsStringAsync().Result);

                Console.WriteLine($"Your order of {quantity} items qualifies for ${discount.Item2.ToString("0.00")} discount");
                Console.WriteLine("'Y' to continue with purchase, 'N' to try again");
                var e2 = Console.ReadLine();

                if(e2.ToLower() != "y" && e2.ToLower() != "n")
                { Console.WriteLine("invalid response"); }

                else if(e2.ToLower() != "n")
                {
                    var serialized2 = JsonConvert.SerializeObject(new { CustomerId = customerId, OrderItems = orderItems });
                    HttpResponseMessage response2 =
                        client.PostAsJsonAsync(InvoicingApiRootUrl + @"/saveneworder", serialized2).Result;
                    response2.EnsureSuccessStatusCode();

                    Tuple orderResult =
                        JsonConvert.DeserializeObject>
                        (response2.Content.ReadAsStringAsync().Result);

                    Console.WriteLine($"Your order of {quantity} items has been received. ");
                    Console.WriteLine($"Total list price of order is ${orderResult.Item2.ToString("0.00")}");
                    Console.WriteLine($"Discount of ${orderResult.Item3.ToString("0.00")} was applied");
                    Console.WriteLine($"You will be billed ${orderResult.Item4.ToString("0.00")}");
                    Console.WriteLine($"Your invoice reference is #{orderResult.Item1}");
                }
            }
        }
    }
}
|
Your interactive Console Input/Output looks like this:
|
CodeTrigger is a very flexbile tool which can be adapted to fit your preferred architecture and has a multitude of options. Here we have shown how to configure your CodeTrigger project to generate shared interface libraries, allow for custom services, business logic and injection, support DDD and any architecture that requires vertical slices through the domain logic, such as SOA, Microservices.
The tricky side of the flexibility of CodeTrigger is that once you depart from the default, managing those very many possible configurations needs more than a passing familiarity with the tool. Luckily this type of configuration usually only needs to be done once at the beginning of the project and with that comes the familiarity should changing the setup be required at a later date.
|